
优化首屏
以下仅是最直接、有效的方式,仅供参考。
1.依赖分割
当项目时间累积,使用第三方模块的数量将会不断增加,从来导致打包后app.js过大,这时候就要抽离一些体积过大的模块,比如echarts。
分割的模块通过link标签rel='preload'或者script标签defer属性实现异步预加载提高首屏加载速度。(Vite或Vue-Cli已帮您实现,可打开dist/index.html查看) link script标签预加载简介
分割思路,可使用打包体积分析插件可视化分析,webpack: webpack-bundle-analyzer, vite: rollup-plugin-visualizer 如下图: 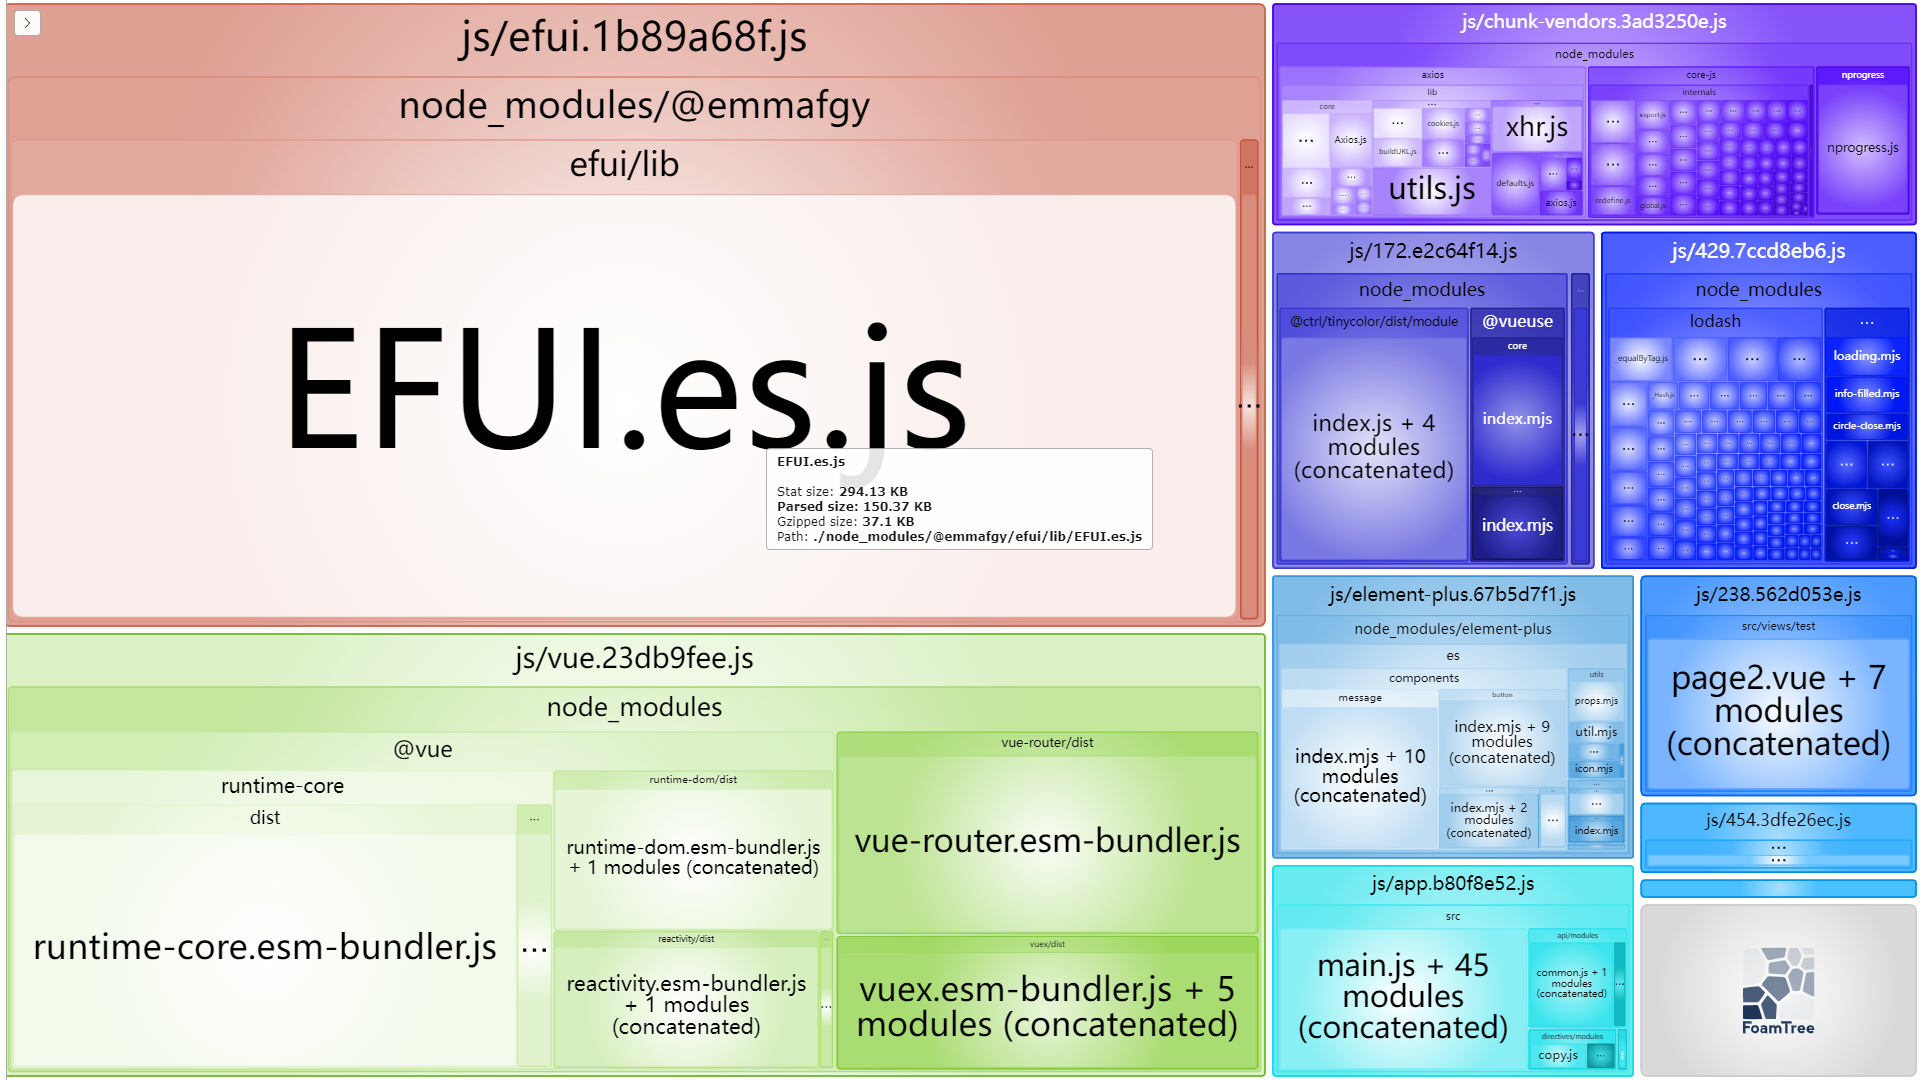
以下是webpack代码分割示例(Vue-Cli路由懒加载代码分割也是基于该插件实现): (完整代码可查看https://gitee.com/fuguiyong/vue3-admin-init.git)
			/**
			 *

			分割代码配置 (https://webpack.docschina.org/plugins/split-chunks-plugin)

			 chunks: 表示哪些代码需要优化,有三个可选值:initial(初始块)、async(按需加载块)、all(全部块),默认为async
			 minSize: 表示在压缩前的最小模块大小,默认为30000
			 minChunks: 表示被引用次数,默认为1
			 maxAsyncRequests: 按需加载时候最大的并行请求数,默认为5
			 maxInitialRequests: 一个入口最大的并行请求数,默认为3
			 automaticNameDelimiter: 命名连接符
			 name: 拆分出来块的名字,默认由块名和hash值自动生成
			 enforce:忽略 minSize、minChunks、maxAsyncRequests 和 maxInitialRequests 选项,并始终为此缓存组创建 chunk。
			 cacheGroups: 缓存组。缓存组的属性除上面所有属性外,还有test, priority, reuseExistingChunk

				 test: 用于控制哪些模块被这个缓存组匹配到
				 priority: 缓存组打包的先后优先级,默认 -20 (子级目录优先级务必大于父级目录)(默认组的优先级为负,以允许自定义组获得更高的优先级(自定义组的默认值为 0))
				 reuseExistingChunk: 如果当前代码块包含的模块已经有了,就不在产生一个新的代码块

			 */

			splitChunks: {
				chunks: "all",
				cacheGroups: {
					// 第三方库抽离
					// defaultVendors 、common 是vue-cli默认配置的
					// defaultVendors: {
					// 	name: 'chunk-vendors',
					// 	test: /[\\/]node_modules[\\/]/,
					// 	priority: -10,
					// 	chunks: 'initial'
					// },
					// common: {
					// 	name: 'chunk-common',
					// 	minChunks: 2,
					// 	priority: -20,
					// 	chunks: 'initial',
					// 	reuseExistingChunk: true
					// },
					// 体积较大的插件单独打包(index.html中与原始 chunks 并行加载,提高首屏加载速度)
					// EFUI
					efui: {
						name: "efui",
						test: /[\\/]node_modules[\\/]@emmafgy[\\/]/,
						// 复用存在chuck
						reuseExistingChunk: true,
					},
					// Vue
					vue: {
						name: "vue",
						test: /[\\/]node_modules[\\/](@vue|vue|vuex|vue-router)[\\/]/,
						reuseExistingChunk: true,
					},
					// 'echarts': {
					// 	name: "echarts",
					// 	test: /[\\/]node_modules[\\/]echarts[\\/]/
					// },
					'element-plus': {
						name: "element-plus",
						test: /[\\/]node_modules[\\/]element-plus[\\/]/,
						reuseExistingChunk: true,
					}
				}
			}
以下是Vite代码分割示例: (完整代码可查看https://gitee.com/fuguiyong/vite-vue3-admin.git)
import {
	splitVendorChunk,
	splitVendorChunkPlugin
} from 'vite'
const getVendorChunk = splitVendorChunk();

/**
 * rollup拆包策略
 * @param {*} id
 * @param {*} options
 */
export default function(id, options) {
	let splitConfig = {
		'efui': /[\\/]node_modules[\\/]@emmafgy[\\/]/,
		'vue': /[\\/]node_modules[\\/](@vue|vue|vuex|vue-router)[\\/]/,
		'element-plus': /[\\/]node_modules[\\/]element-plus[\\/]/
	};

	for (let key in splitConfig) {
		let sc = splitConfig[key];
		if (sc.test(id)) return key;
	}

	return getVendorChunk(id, options);
}
2.gzip
GZIP是网站压缩加速的一种技术,对于开启后可以加快我们网站的打开速度,原理是经过服务器压缩,客户端浏览器快速解压的原理,可以大大减少了网站的流量。 在 http/1.0 协议中关于服务端发送的数据可以配置一个 Content-Encoding 字段,这个字段用于说明数据的压缩方法
Content-Encoding:gzip (常用)
Content-Encoding:compress
Content-Encoding:deflate
客户端在接受到返回的数据后去检查对应字段的信息,然后根据对应的格式去做相应的解码。 客户端在请求时,可以用 Accept-Encoding 字段说明自己接受哪些压缩方法。
Accept-Encoding:gzip,deflate
第一种方式:Web容器配置压缩
直接配置web容器压缩即可(前端项目构建不用生成.gz文件),以下是nginx配置示例(直接放在http模块下即可):
        #开启gzip功能
        gzip on;
        #gzip缓存大小
        gzip_buffers 4 16k;
        #gzip http版本
        gzip_http_version 1.1;
        #gzip 压缩级别 1-10
        gzip_comp_level 5;
        #gzip 压缩类型
        gzip_types text/plain application/javascript text/css application/xml text/javascript application/x-httpd-php image/jpeg image/gif image/png;
        # 是否在http header中添加Vary: Accept-Encoding,建议开启
        gzip_vary on;
第二种:应用构建时压缩 && Web容器开启对应配置(推荐)
- 配置前端项目构建压缩插件生成.gz文件
webpack compression-webpack-plugin gzip压缩插件配置示例:
(完整代码可查看https://gitee.com/fuguiyong/vue3-admin-init.git)
// vue.config.js sample

const CompressionPlugin = require('compression-webpack-plugin');

module.exports = {
	configureWebpack:{
		plugins:[
			 new CompressionPlugin()
		]
	}
}
vite vite-plugin-compression gzip压缩插件配置示例
(完整代码可查看https://gitee.com/fuguiyong/vite-vue3-admin.git)
import {
    defineConfig
} from 'vite'
import vue from '@vitejs/plugin-vue'
import compressPlugin from "vite-plugin-compression"; //静态资源压缩
import {
    resolve
} from 'path';

// https://vitejs.dev/config/
export default defineConfig({
    plugins: [
        vue(),
        compressPlugin({ //gzip静态资源压缩
            verbose: true, // 默认即可
            disable: false, //开启压缩(不禁用),默认即可
            deleteOriginFile: false, //删除源文件
            threshold: 10240, //压缩前最小文件大小
            algorithm: 'gzip', //压缩算法
            ext: '.gz', //文件类型
        })
    ]
})
- 上传构建文件到web容器
- 配置web容器&&重启
		#开启gzip功能
        gzip on;
        #开启gzip静态压缩功能(gzip_static on),开启会寻找.gz文件,直接返回(节约了web容器自己压缩的时间)
        #gzip_static模块必须同时保留原始静态文件和gz文件
        gzip_static on;
        #gzip缓存大小
        gzip_buffers 4 16k;
        #gzip http版本
        gzip_http_version 1.1;
        #gzip 压缩级别 1-10
        gzip_comp_level 5;
        #gzip 压缩类型
        gzip_types text/plain application/javascript text/css application/xml text/javascript application/x-httpd-php image/jpeg image/gif image/png;
        # 是否在http header中添加Vary: Accept-Encoding,建议开启
        gzip_vary on;
如何知道nginx是动态压缩的还是直接获取的提前构建的.gz文件?
- 首先vue压缩文件夹dist下有相同命名后缀为.gz的压缩包;
- 查看nginx是否支持gzip_static on配置,使用命令nginx -V查看,如果有--with-http_gzip_static_module模块表示支持
- 查看ETag响应头,如果存在W/开头则表示是经过nginx进行压缩的,而不是直接获取到的压缩包;
- 也可以对比文件大小来查看,修改gzip_comp_level的压缩等级比较dist打包好的gz压缩包